Why hardwire small cabin accessories
Imagine plugging your dash cam or cabin lights into a wall charger through an inverter. Your battery sends 12V DC to the inverter, which burns energy turning it into 110V AC — then the wall charger burns more energy turning that AC back into DC. Every conversion step bleeds power as heat. A dedicated 12V adapter skips those extra steps entirely and keeps more power in your battery.
But there’s one big detail to check before you buy anything. Many hardwire kits come with a preset low-voltage cutoff wired too low — some as low as 11.6V. If the kit doesn’t cut power until the battery hits that level, you could wake up to a battery so drained it won’t start your engine or run your cabin lights. Always check what cutoff voltage a kit offers before you hand over your money.
If you’re running off a portable power station, there’s another trap worth knowing about. The DC output on many stations stays on by default, and a hardwired accessory plugged into it will slowly bleed power even when you think everything’s off. Keep an eye on it or make sure your solar input can cover the trickle drain.
Who this is for and plan-it-first warning
This information is for anyone building out a small cabin, van, or RV. By the end of this guide you will have a clear plan for picking a kit, routing your wires, and skipping the three mistakes that leave most owners either hunting for visible wiring or stuck with a flat battery.
Don’t wait until the walls and ceiling are up to think about wires — by then it’s too late to run them where you actually want them. You will end up with wires dangling or running across visible surfaces because you could not get them behind the insulation before it closed up. One builder had to skip a ground wire entirely because there was no way to route it through a thick styrofoam-insulated wall. Plot out where your accessories will go and how the wires will reach them before you close up any surfaces.
Top product picks
When looking at the best options, two specific types of gear come up most often in research: dash cam hardwire kits and accessory power panels.
For dash cameras, the REDTIGER F7N USB-C hardwire kit is a highly recommended choice. It handles 12V-24V input and provides a 5V/2A output with an 11.8V cutoff. It is praised for its durability in hot environments because it uses a double-fuse system and includes protections against overheating, short circuits, and reverse connections.
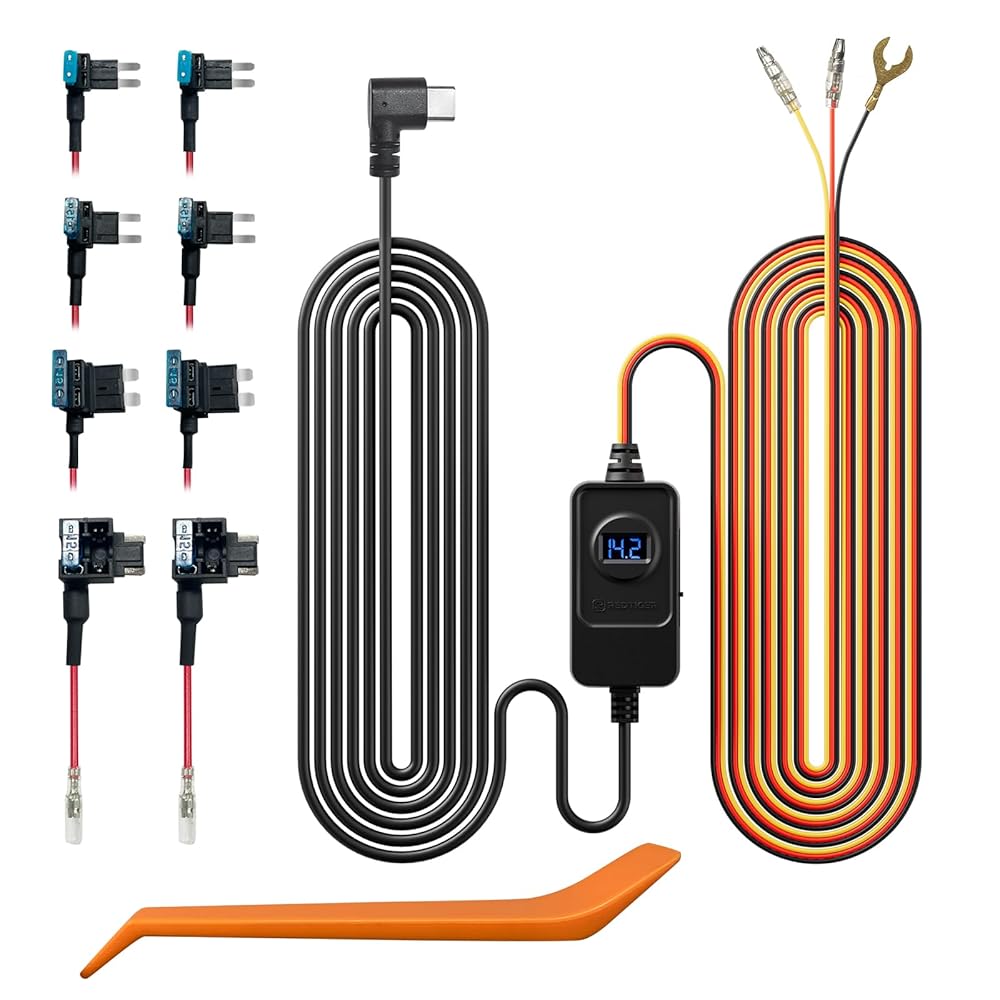
REDTIGER Dash Cam Acc Multi-Size Hardwire Kit with Voltage Indicator for All REDTIGER Dash Camera, USB C Power Port, 24H Parking Monitoring with Low Voltage Protection, Cable
gearnudge.com
- Best for
- A highly rated, durable kit with built-in voltage protection.
- Avoid if
- You need confirmed live price or guaranteed fit from this page.
- Evidence
- Listing and source evidence
For managing your cabin power, a flush-mounted panel is a great way to keep things tidy. Testers suggest using a unit that includes a voltmeter so you can see your battery level at a glance.
Fuse and wire rules you must get right
The most important thing to remember is that the fuse protects the wire, not your device. The fuse’s job is to blow if the wire gets too hot, preventing a fire.
To do this safely, follow these rules:
- Match the rating: The fuse rating must be higher than the device’s current draw, but it must be lower than the wire’s maximum capacity (ampacity).
- Keep it short: The run from your battery to your first fuse is the only part of the wire that isn’t protected. Keep this run as short as possible, ideally under 6 inches.
- Size your gauge: Use wire that is thick enough for the job. For a short run with a 10A fuse, 16 AWG wire is fine. If you are running a wire about 15 feet, you should bump up to a heavier 12 AWG wire to prevent voltage drop.
Step-by-step setup before purchase
If you are using the fuse-tap method, you need to be methodical.
- Locate your fuse box.
- Use a circuit tester to find a “constant” fuse (one that always has power) and a “switched” fuse (one that only has power when things are turned on). In a stationary cabin without an ignition, use a switched circuit like a light or an accessory tap on your bus bar.
- Use add-a-fuse adapters to tap into both.
- Connect the red wire to the constant source and the yellow wire to the switched (ACC) source.
- Connect the C-shaped black wire to a metal ground.
Always follow the labels on your specific kit, as wire colors like red, yellow, and black can vary. When finding a ground, make sure you are hitting bare metal. A bolt might look like a good ground, but if it only screws into plastic, it won’t work. Finally, be careful during battery swaps; even a split-second wrong connection can trip breakers or blow polarity fuses.
Common failure modes to avoid
Many owners run into the same frustrating issues. The most common is a kit that simply drains the battery because the cutoff is set too low.
You might also run into a fuse that keeps blowing for no obvious reason. You wiggle a fuse back in, everything works for a while, then it pops again. One owner was stumped by this until they realized the culprit was a loose connection at their shore-power plug — wiggling that plug back in fixed it for good. When a fuse behaves like this, stop replacing it and start hunting for the loose or corroded connection that’s causing the problem.
Lastly, watch out for accidental reversals. Because DC color coding is different from the AC power you use at home, it is very easy to hook things up backward, which can instantly blow your panel fuses.
Setup checks and return-readiness
Before you start cutting wires or committing to a purchase, run through this checklist:
- Path check: Can you actually route each wire through your insulated walls? Test a route manually before you buy.
- Power station check: If using a portable power station, can you turn the DC output off, or is it always running?
- The big plan: Have you finalized where all your switches and wires will go before you put up the ceiling?
- Voltage match: Does the kit’s cutoff voltage actually match your specific battery bank?
Cabin caveat
Most of the lessons and data used here come from people building vans and RVs. If you are building a stationary cabin, you should verify that these same rules for grounding, fusing, and voltage cutoffs apply to your specific battery bank and charging setup. Always test at least one wire route through your actual wall construction before you buy a full system.
FAQ
Why hardwire instead of using an inverter?
Every conversion wastes power as heat. An inverter turns 12V DC into 110V AC, then the wall charger turns it back into DC. A 12V adapter skips both steps and keeps more power in the battery.
What should I check on a kit before I buy?
The low-voltage cutoff. Some kits are preset as low as 11.6V, which can leave the battery too flat to start the engine. Confirm the cutoff suits your battery bank.
How do I size the fuse and the wire?
The fuse protects the wire, not the device. Rate it above the device's draw but below the wire's ampacity, keep the unprotected run from the battery to the first fuse under about 6 inches, and use 16 AWG for a short 10A run or 12 AWG for a run of about 15 feet.
Which fuses does a hardwire kit tap?
A constant fuse and a switched one, found with a circuit tester. Red goes to constant, yellow to switched, and the black wire to bare metal — a bolt that only threads into plastic is not a ground.
A fuse keeps blowing for no clear reason. What now?
Stop replacing it and hunt for a loose or corroded connection. One owner traced repeated blows to a loose shore-power plug.
When should I plan the wiring?
Before the walls and ceiling go up. One builder had to skip a ground wire entirely because there was no route through a thick styrofoam-insulated wall.